The traffic rules provide for a number of requirements and standards for cars that travel on public roads. All of them are aimed at reducing the accident rate and the number of road accidents.
Not in last place among the causes of collisions and accidents is improperly performed tinting. Many car enthusiasts are overly interested in the appearance of the car, forgetting about practicality and safety.
However, not everyone knows how much tinting of headlights affects traffic safety and whether it is necessary. It is important to figure out how to do tinting correctly without running into a fine for violating traffic rules. But at the same time give the car a beautiful, original appearance.
Why do you need headlight tinting?
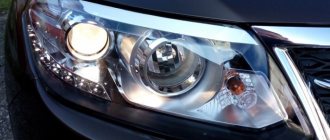
Headlight tinting is part of standard tuning. Tinted optics allow you to transform the appearance of the car. With proper selection of tinting shade, the headlights are better combined with the body and other elements.
In addition to changing the appearance of headlights, tinting increases the standard strength of glass or plastic. Additional protection extends the life of the lighting elements and prevents damage from flying stones.
A car with tinted headlights takes on a unique look. But is it really that simple?
Light tinting: to pay a fine or not?
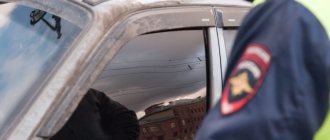
There are many cars on the roads with poorly tinted headlights. In practice, violators are not often held accountable for such actions. The inspector simply does not see such tinting and cannot hold the owner accountable. In fact, he can do this based on the rules of the law. Therefore, even for weak tinting one day you will have to pay. But if it’s not very visible, then you can try and test your luck.
Standards for tinting lighting fixtures: can it be done and how?
The legality of tinting the optical devices of a car is regulated by the Code of Administrative Offenses of the Russian Federation. At the same time, the code does not have a clear interpretation of the ban on changing the appearance of headlights. The vagueness of the concept of tinting leads to the fact that each situation is considered individually.
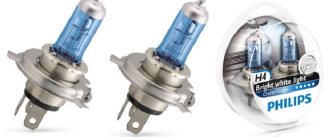
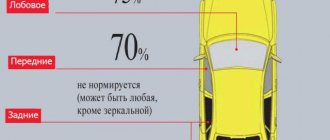
An administrative fine for tinting headlights can be issued on the basis of articles of the Code of Administrative Offenses 12.4 clause 1 and 12.5 clause 3. The first case refers to the use of red headlights. The fine for individuals for this violation is 3 thousand rubles. According to Article 12.5, paragraph 3, a car owner may be deprived of a driver’s license for a period of 6–12 months when installing front lighting devices whose operating mode and color do not comply with GOST. The standard states that low and high beams can only be white. Therefore, color film that changes the color of the light beam is not suitable. It is allowed to glue either white (transparent or yellow) film to fog lights.
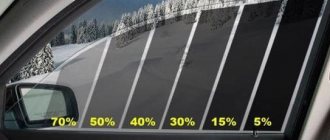
According to established safety standards, the tint film should absorb no more than 15% of the brightness of light radiation
The fine for tinting rear headlights, including stop lights, is issued in accordance with paragraph 1 of Art. 12.5. The driver can receive a fine of 500 rubles if defects are discovered or there is no permission to operate the car due to tinting of the rear optics with a subsequent decrease in light transmission.
Advantages and disadvantages
Tinting rear or headlights with film has a number of advantages:
- Easy to do. You can do the procedure yourself without spending money on the services of a specialist.
- Cleans up easily. This is especially true in proceedings with traffic police officers.
- The film is available in different colors. It is not difficult to choose a material to match the color of the car.
- Does not wear off during use. Retains aesthetic characteristics for a long time.
- Performs a protective function. Prevents scratches and chips on lighting fixtures.
- Forms a smooth surface. Provides uniform light dispersion.
The disadvantages include the higher cost compared to applying tinted varnish. In addition, tuning is noticeable only when the lighting is on, that is, on a sunny day the car will not stand out much among other cars.
What material to choose for proper tinting
Changing the color of headlights using tinting film is the best option, since the material transmits more light and covers the surface uniformly. By choosing the right film color, you can not only influence the appearance of the optics, but also avoid problems with traffic police officers. Common types of headlight film are the following:
- Matte - suitable for cars whose body is also covered with matte material.
- Glossy - ensures the unity of the headlights and the body, protects the surface of the optics from abrasions, chips and scratches.
- Chameleon - shimmers when the headlights are turned on and is characterized by increased light transmittance.
- Metallized - has a charcoal tint, reflects up to 50% of infrared radiation and is completely protected from fading.
Well-known brands of car tint films include LLumar, SunTek, Sun Control and Oracal. Films produced under the listed brands have proven themselves to be of good quality and long service life, so if there are no strict budget restrictions, they are worth choosing.
The variety of colors is amazing, but not all films have suitable light transmittance
How to choose a tint film
To ensure a good result that will last for a long time, you need to take a responsible approach to the choice of film. It depends on appearance and strength, so it’s worth remembering a few tips:
- Only special material intended for headlights and lanterns is used. You should not use film for windows or car glass; it is not strong enough.
- Color is determined individually. But don’t go to extremes and choose dark materials; they don’t look the best, plus they distort the colors of the turn signals and brake lights.
- It is better to select options from the middle or high price segment. Cheap films are of appropriate quality and are often damaged during operation.
How to tint headlights with film or varnish
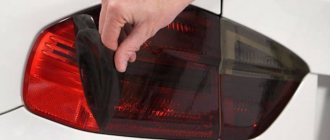
The process of tinting car optics involves performing several simple steps. When using film, headlight tinting is performed as follows:
- Remove and clean the headlights from dirt, wipe them with a degreaser. Then wipe the surface dry.
Remove the headlights - Place the film against the optics and mark the contour boundaries with a felt-tip pen to make a blank of the appropriate size.
Cover the headlight with film - Using a spray bottle, apply a soap solution to the surface of the headlight and the back of the film.
The tinting solution is prepared as follows: 5 drops of product (fairy, shampoo and similar) per 1.5 liters of water - Apply the tint to the headlight and heat it evenly with a hairdryer over the entire area.
A household hair dryer will not work, but don’t go overboard with a construction hair dryer either! - Having obtained a smooth surface covered with film, tuck the edges and glue them to the headlight. Cut off the excess material with scissors and secure the headlight in its original place.
Make sure that no small particles get under the film during gluing.
Using the instructions described above, you can also tint the rear lights. The only difference is that the rear optics can not be dismantled for gluing the film.
When using tinting varnish, you must adhere to the following instructions:
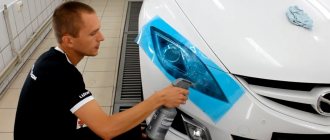
- Remove and clean the headlights, then place them on a flat surface and cover with thick material those areas where the varnish should not come into contact.
Sometimes the headlights are not removed, protecting the surface around them with a film, but then the work will look less neat - Shake the can of varnish and apply a thin layer of it to the surface of the headlight from a distance of about 25–30 cm. A professional spray gun is used in the photo.
Without painting skills, you can easily get drips after painting - After applying the base coat, allow the headlight to dry completely. Then apply another 2-3 layers and after the optics have dried, install it back.
Protected areas were left unpainted. Thus, the headlights changed color and the traffic regulations were complied with
How to tint the rear ones red: the fastest way on video
How to make stickers on the front (video)
Finished works in the photo (options for Chevrolet Cruze, VAZ and others)
Idea for VAZ
Chameleon film
Example on a Chevrolet Cruze
Option for Subaru
Tuning method for Mazda
The procedure for self-tinting with varnish
Tinting taillights with a special film has many more advantages compared to using varnish. But we should also tell you a little about him.
Tinting with varnish is the easiest way to change the appearance of a vehicle. Applying the material to the optics is not difficult. Here you don’t even have to disassemble the lighting fixtures. You will only need regular masking tape to cover parts that cannot be painted.
If you don't want to spend a lot of money, you can get by with spray paint. They are sold in a huge assortment in automotive chemical stores. But the only good thing about this option is the price. Everything else is filled with flaws. It is strongly not recommended to paint optics with spray paint, since it significantly reduces the ability of the headlights to transmit light through the painted housing.
No one argues that after applying varnish, the car looks original, stylish and beautiful. But there is no need to talk about practicality and safety here. If you use varnish, then only a special one, designed specifically for tinting headlights. It is sprayed onto the prepared, cleaned surface, after which all that remains is to wait until it dries completely.
After the work is completed, while the car is in the garage, the varnished headlights look great. But this effect does not last very long. Varnish tends to gradually deteriorate under the influence of ultraviolet radiation and precipitation. And this does not depend on the quality of the varnish or the manufacturer. Higher quality materials can last a little longer.
Common problems with tinting work
Even if you follow the instructions for working with tinting materials, car owners often encounter minor difficulties. When gluing the film, unevenness and bubbles may occur due to the entry of air. To eliminate defects, it is enough to use a smoothing squeegee.
In the case of tinting using varnish, the main problem is dirt getting onto the surface of the headlight and the appearance of smudges during drying. All unnecessary elements must be promptly removed using a solvent.
Recommendations for choosing film
The first step is to purchase the material itself, preferably high-quality one. Cheap products from the Middle Kingdom are unlikely to be suitable if you are going to glue it for the first time in your life. A simple rule applies here: the cheaper the product, the more difficult it is to apply it beautifully to the headlights.
Advice. To successfully cope with the task, it is preferable to take high-quality film with two protective layers from the following well-known brands: Orafol (Germany), 3M (Japan), LLumar and Sun Solar (USA).
The choice of colors for tinting films is very wide.
In addition to the selection of colors and additional tinting effects, which you will do yourself, you need to choose a film according to 3 criteria:
- The degree of translucency (otherwise known as light transmittance). Remember that too darkening a material will not only create problems with traffic police, but will also affect your own safety at night.
- Product thickness (varies from 0.6 to 1.2 mm). The thinner the polymer, the more convenient it is to glue, but the worse its protective properties.
- The ability to stretch when heated allows the film to be easily glued to various curved surfaces of headlights, for which many modern cars are famous.
To determine the amount of film, you should measure the optics
Advice. Before going to the store, do not forget to estimate the approximate area of the film needed to cover the front and rear lights. Add a margin of at least 30% to it in case your first experiment is unsuccessful, which means you have to throw away some of the damaged material.
Conditions for caring for tinted optics on a car
Regardless of how car headlights are tinted, they can endure high-pressure washing and other more severe abuse. The operation of tuned optics is not limited in any way, which is an important advantage of tinting. Moreover, if necessary, you can easily remove the tint by prying it off and carefully removing the film or removing the varnish using a solvent.
Despite the simplicity of tinting car headlights, making mistakes or using low-quality materials can lead to a decrease in light transmittance. In addition, the presence of film or varnish on the surface of the headlights can lead to difficulties when passing technical inspection. Before tuning, you should carefully weigh all the advantages and disadvantages, and when actually performing the work, it is important to follow the tinting rules established by law.
Removing glue from glass after tinting: minimum time and cost
Direct flow - how to make it yourself.
How to make high-quality window tinting
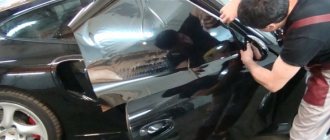
Are they promising to tint your car in one hour? You should not fall for such tricks of unscrupulous “masters”. In order to make high-quality tinting of your car windows, it takes much more time. Initially it may seem like what’s so complicated about it, stick it on, cut it and you’re done. But that's not true. We will tell you what stages of work need to be completed in order to end up with high-quality tinting that will last for many years and will not accidentally come off or peel off. So about the step-by-step tinting process:
1. Washing the body 2. Removing dust from the side window guides 3. Dismantling trims, seals or other interior parts that interfere with the control of the fit of the tint film 4. Cutting the film for each car window on the stand 5. Shaping the tint film 6. Transferring the film to the inside part of the glass 7. Displacing the solution from under the film while drying it with a hairdryer 8. Reinstalling the dismantled casings
DIY gluing process
It is necessary to do tinting in a bright and warm room, and it is better with an assistant. It is unacceptable to work outdoors, where the wind blows dust that instantly settles on wet surfaces. To successfully tint the headlights, you need to prepare the following tools and auxiliary materials:
- a special plastic spatula with a rubber end called a squeegee;
- water tank with hand sprayer;
- construction hair dryer;
- scissors, a thin sharp knife (a stationery knife will do);
- tape measure and marker;
- soft rags or paper napkins;
- alcohol-based glass cleaner.
Set of tools for gluing film
Advice. If you don’t have a hair dryer, use a household hair dryer. To once tint the optics, it is quite enough.
To begin, measure the headlight lengthwise and crosswise with a tape measure to make a rough pattern. When cutting the material, allow a margin of 2 cm on each side. The further order of operations is as follows:
- Wash the headlights thoroughly with glass cleaner and dry them without touching them with your hands. While drying, cut out a piece of polymer to the required size.
- Remove the bottom protective layer from the film and moisten its surface with water using a sprayer. Also spray water on the headlight.
- Apply the tint to the optics so that the reserve is evenly distributed along the edges.
- Using a squeegee, gradually remove all the water from under the film, starting from the center and moving towards the edges. Avoid folds and distortions; work especially carefully on the outer zones.
- In places where the surface bends, where folds form, heat the material with a hairdryer and stretch it out a little.
- After making sure that the film fits tightly to the headlight in all places, trim off the excess with a knife, then go over the edges with a squeegee again.
- Carefully peel off the top protective layer and remove it from the tint. This completes the work.
It is better to tint long headlights together with an assistant
Advice. When using a spatula, do not be afraid to somehow damage the tint and press safely (within reason). The top layer serves precisely to protect the main film during the gluing process.
On a complex surface, the film must be heated with a hairdryer and stretched.
After tinting the lighting fixtures, check how well the film adheres to the corners. If in some places it extends beyond the scope of the optics, then such excess needs to be trimmed off. Then you can start gluing the rear lights, which is done using the same technology.
The procedure for gluing the film in the photo
When measuring the headlight for a pattern, add a margin of 2 cm on each side. Based on the measurements, sheets of material are cut out. The headlight must be thoroughly washed and sprayed with water. For gluing, you need to separate the protective layer. The film also needs to be moistened. Apply the film with an even margin on all sides. The polymer sticks when you run water from under it with a spatula. In difficult places, the material must be tightened, heating it with a hairdryer. After gluing, the remaining film is cut off. The cut part is carefully removed. At the end, do not forget to remove the top protective layer from the film.